Fresh Finds: 11/15-11/21
Cole Pettengill • November 19, 2019
The new releases, new-to-me songs, and other jams I'm binging this week.

This weeks playlist starts off with some familiar names like Lauv and Billie Eillish but turns to some new names for a good blend of pop, rock, and more. It gets a bit funky with No Fear No More
by Madeon and then mellows a bit in the middle with COIN and Yoke Lore. It all rounds out with high energy jams heavy on the electric side which are great for the gym or the pre-game.
I'm always looking for new music yand would love to hear what you're all listening to right now! Drop any suggestions in the comments below and you may see it on next week's playlist. Keep jamming and check back next Tuesday for some more Fresh Finds. And if you like what you hear, follow me on Spotify @colepettengill!
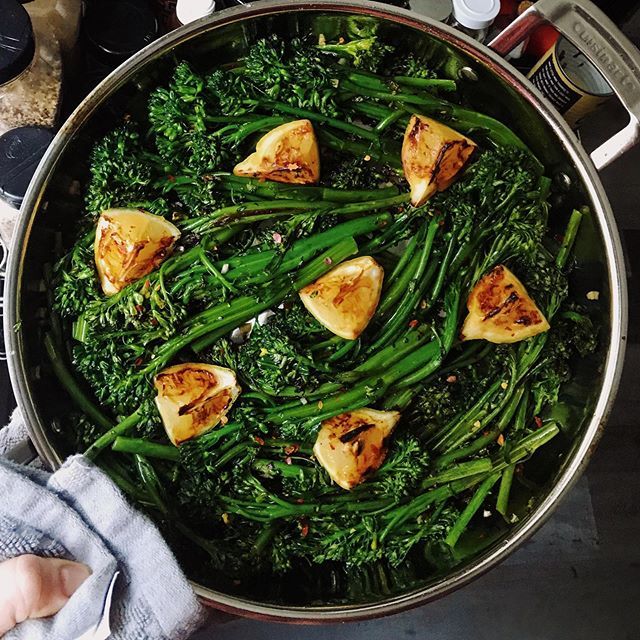
No, it's not just long broccoli.
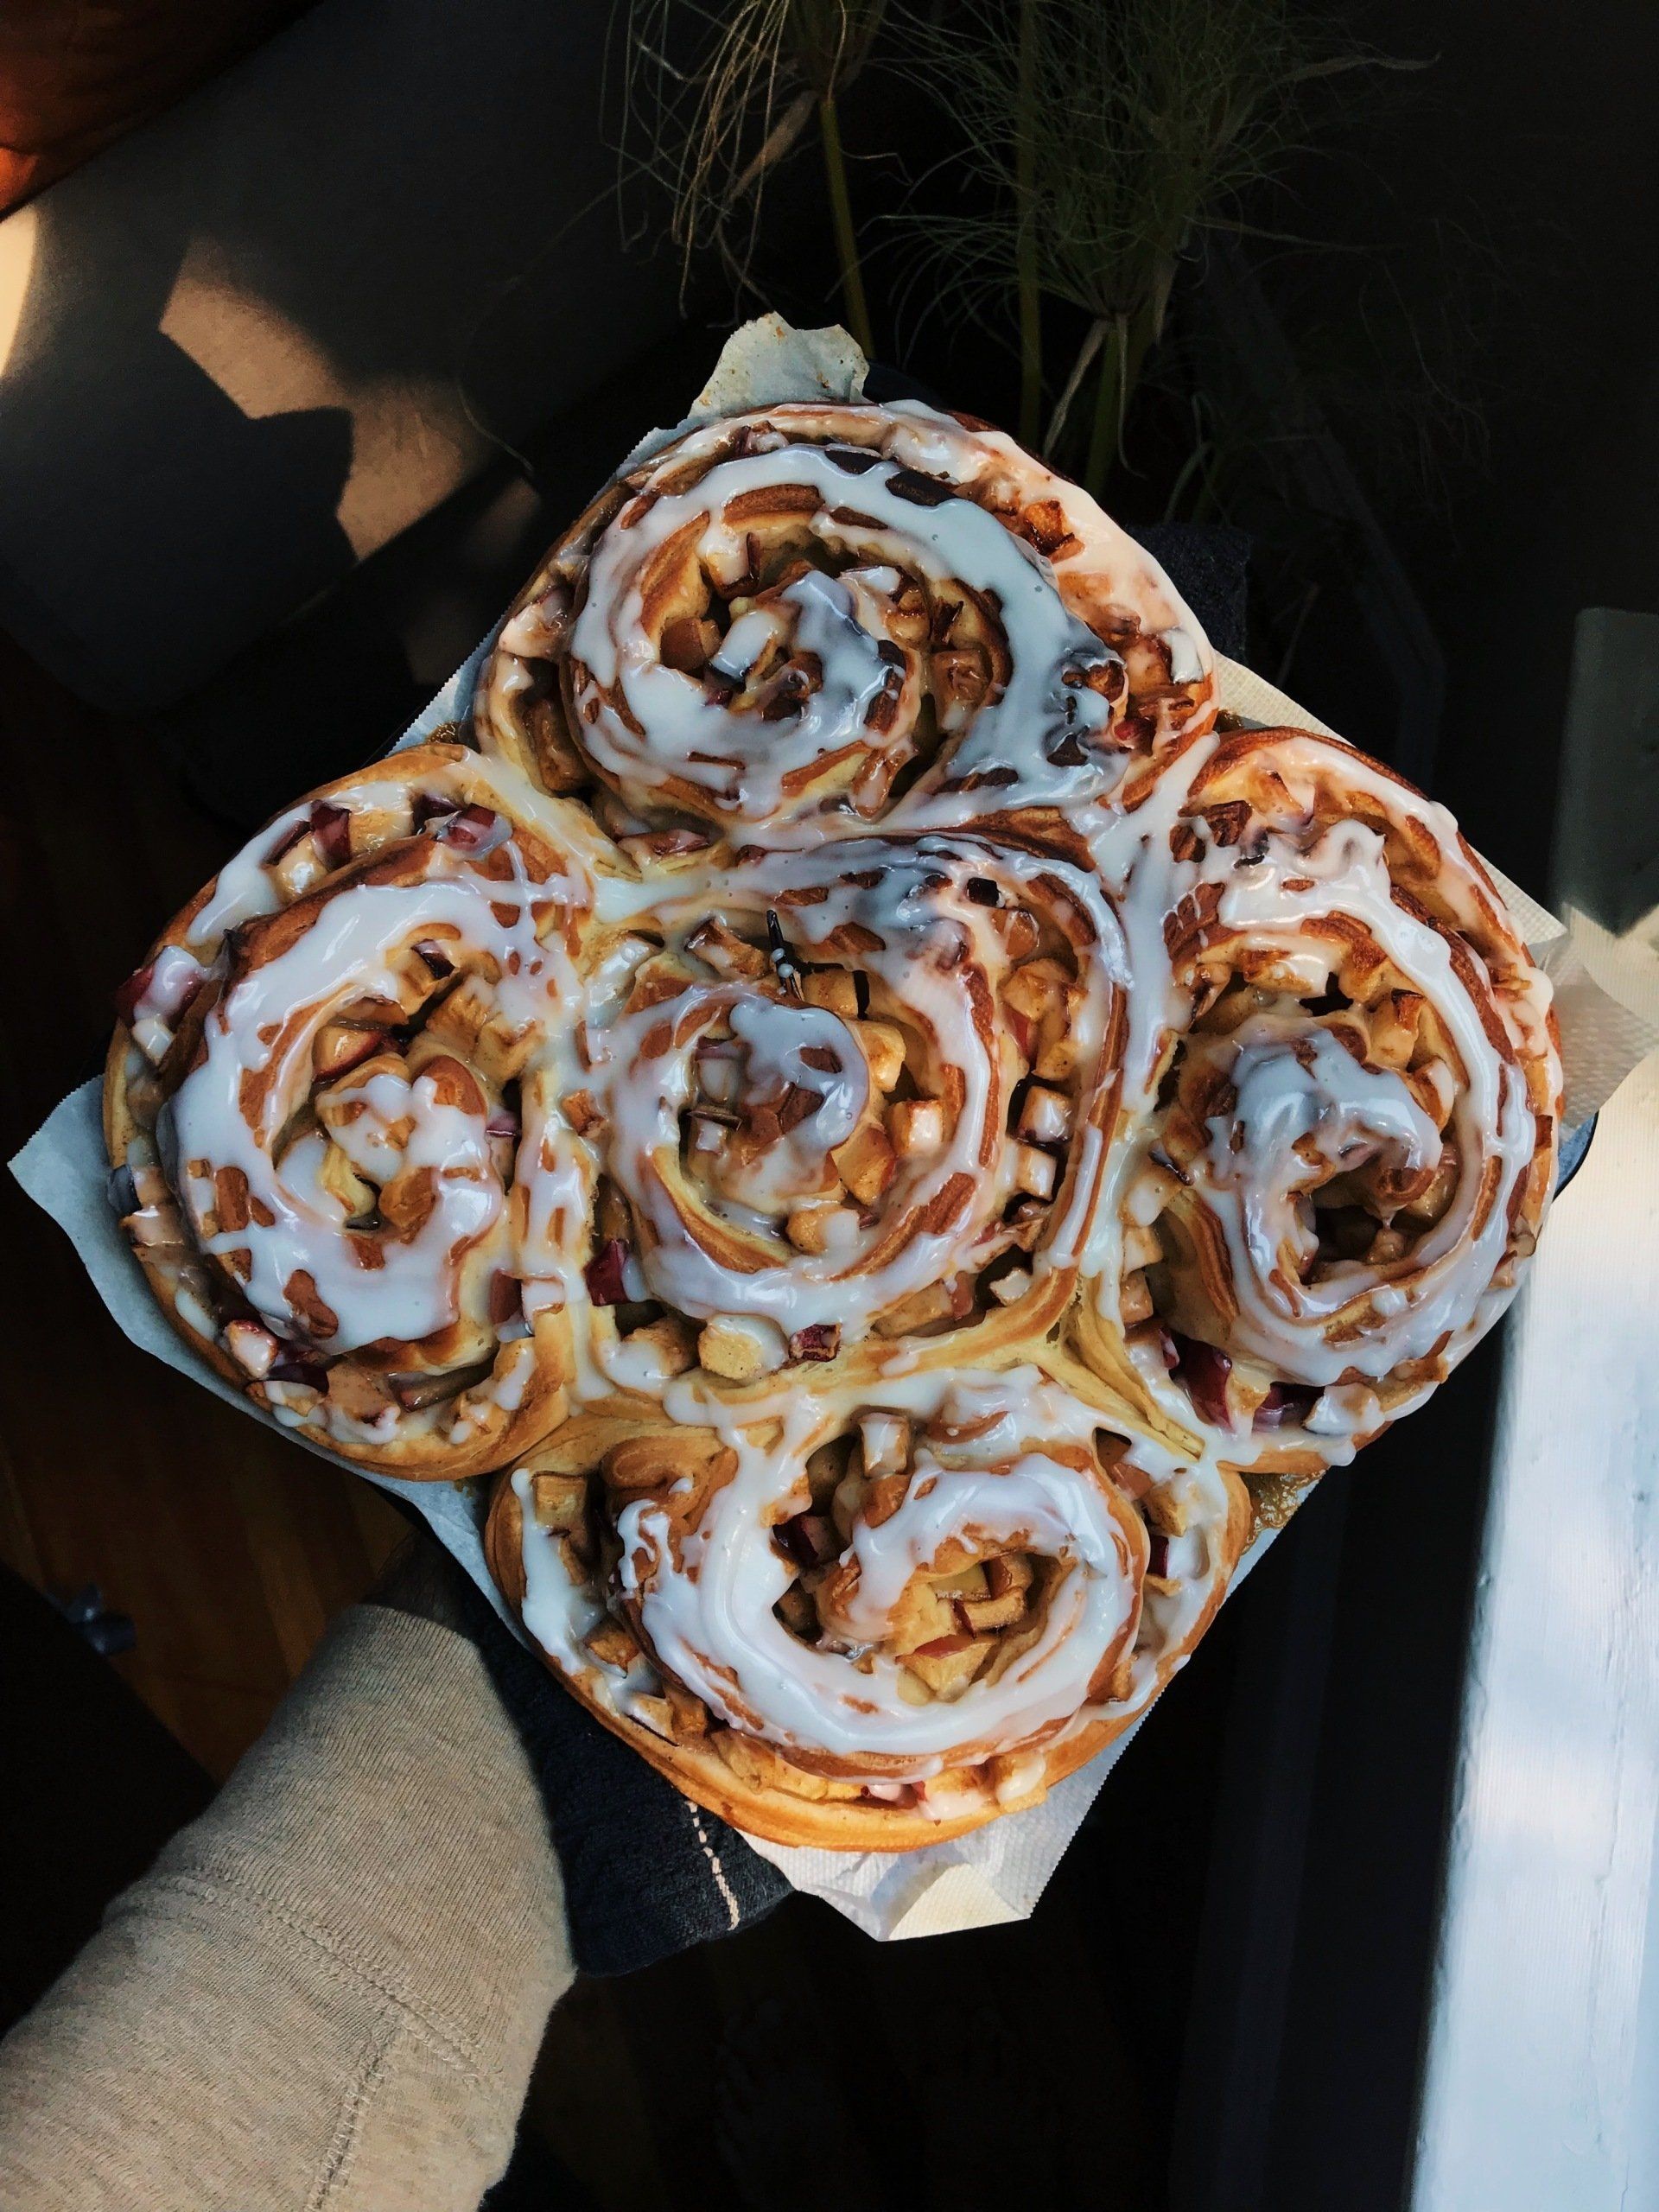
Cinnamon Apple Morning Buns Cinnamon bun dough courtesy of NYT Cooking *For plagiarism purposes, I cannot post the ingredient list. 3 pounds of good baking apples (I like Cortlands) 1/2 cup (1 stick) of unsalted butter 1 cup of light brown sugar 1/4 cup of white sugar 2 TBSP cinnamon 2 tsp of nutmeg 1/2 tsp of salt 2 cups confectioners sugar 4 TBSP milk or cream Step 1: Make the dough according to the recipe. Step 2: Dice apples so they are about 1 centimeter by 1 centimeter. They do not have to be peeled, but if you prefer to leave the skin off then you can. Toss the apples with white sugar, 2 tsp of cinnamon, and 1 tsp of nutmeg. Step 3: Melt butter in a sauce pan and set aside to cool slightly. In a separate bowl, mix the brown sugar with the remaining cinnamon, nutmeg, and salt. Step 4: Divide the dough in half and, on a lightly floured surface, roll each piece of dough into equal sized rectangles. They should be about 10 inches by 15 inches each. Step 5: Brush one piece of dough with butter and sprinkle half of the brown sugar mixture over it. Add the apples on top to create an even layer over the dough. Leave a 1 inch border all around. Place the second piece of dough over the apples. Step 6: Brush the top of the second piece of dough with the remaining butter and sprinkle the rest of the brown sugar mixture. Tightly roll the dough lengthwise ( aka the shorter side should be the side you are rolling). You will lose some apple filling but that is okay. Step 7: Using a sharp knife, cut the rolls into 5 equal sized pieces. Place them a on a baking sheet at least 2 inches apart. Let them sit, covered by a clean kitchen towel, in a warm place for an hour to rise. Preheat your oven to 375°. Step 8: B ake for 30-35 minutes, until they golden brown. Step 9: Whisk confectioners sugar and milk until it is smooth and thick. Once the buns have cooled enough, spoon and spread the glaze over the top, and enjoy.
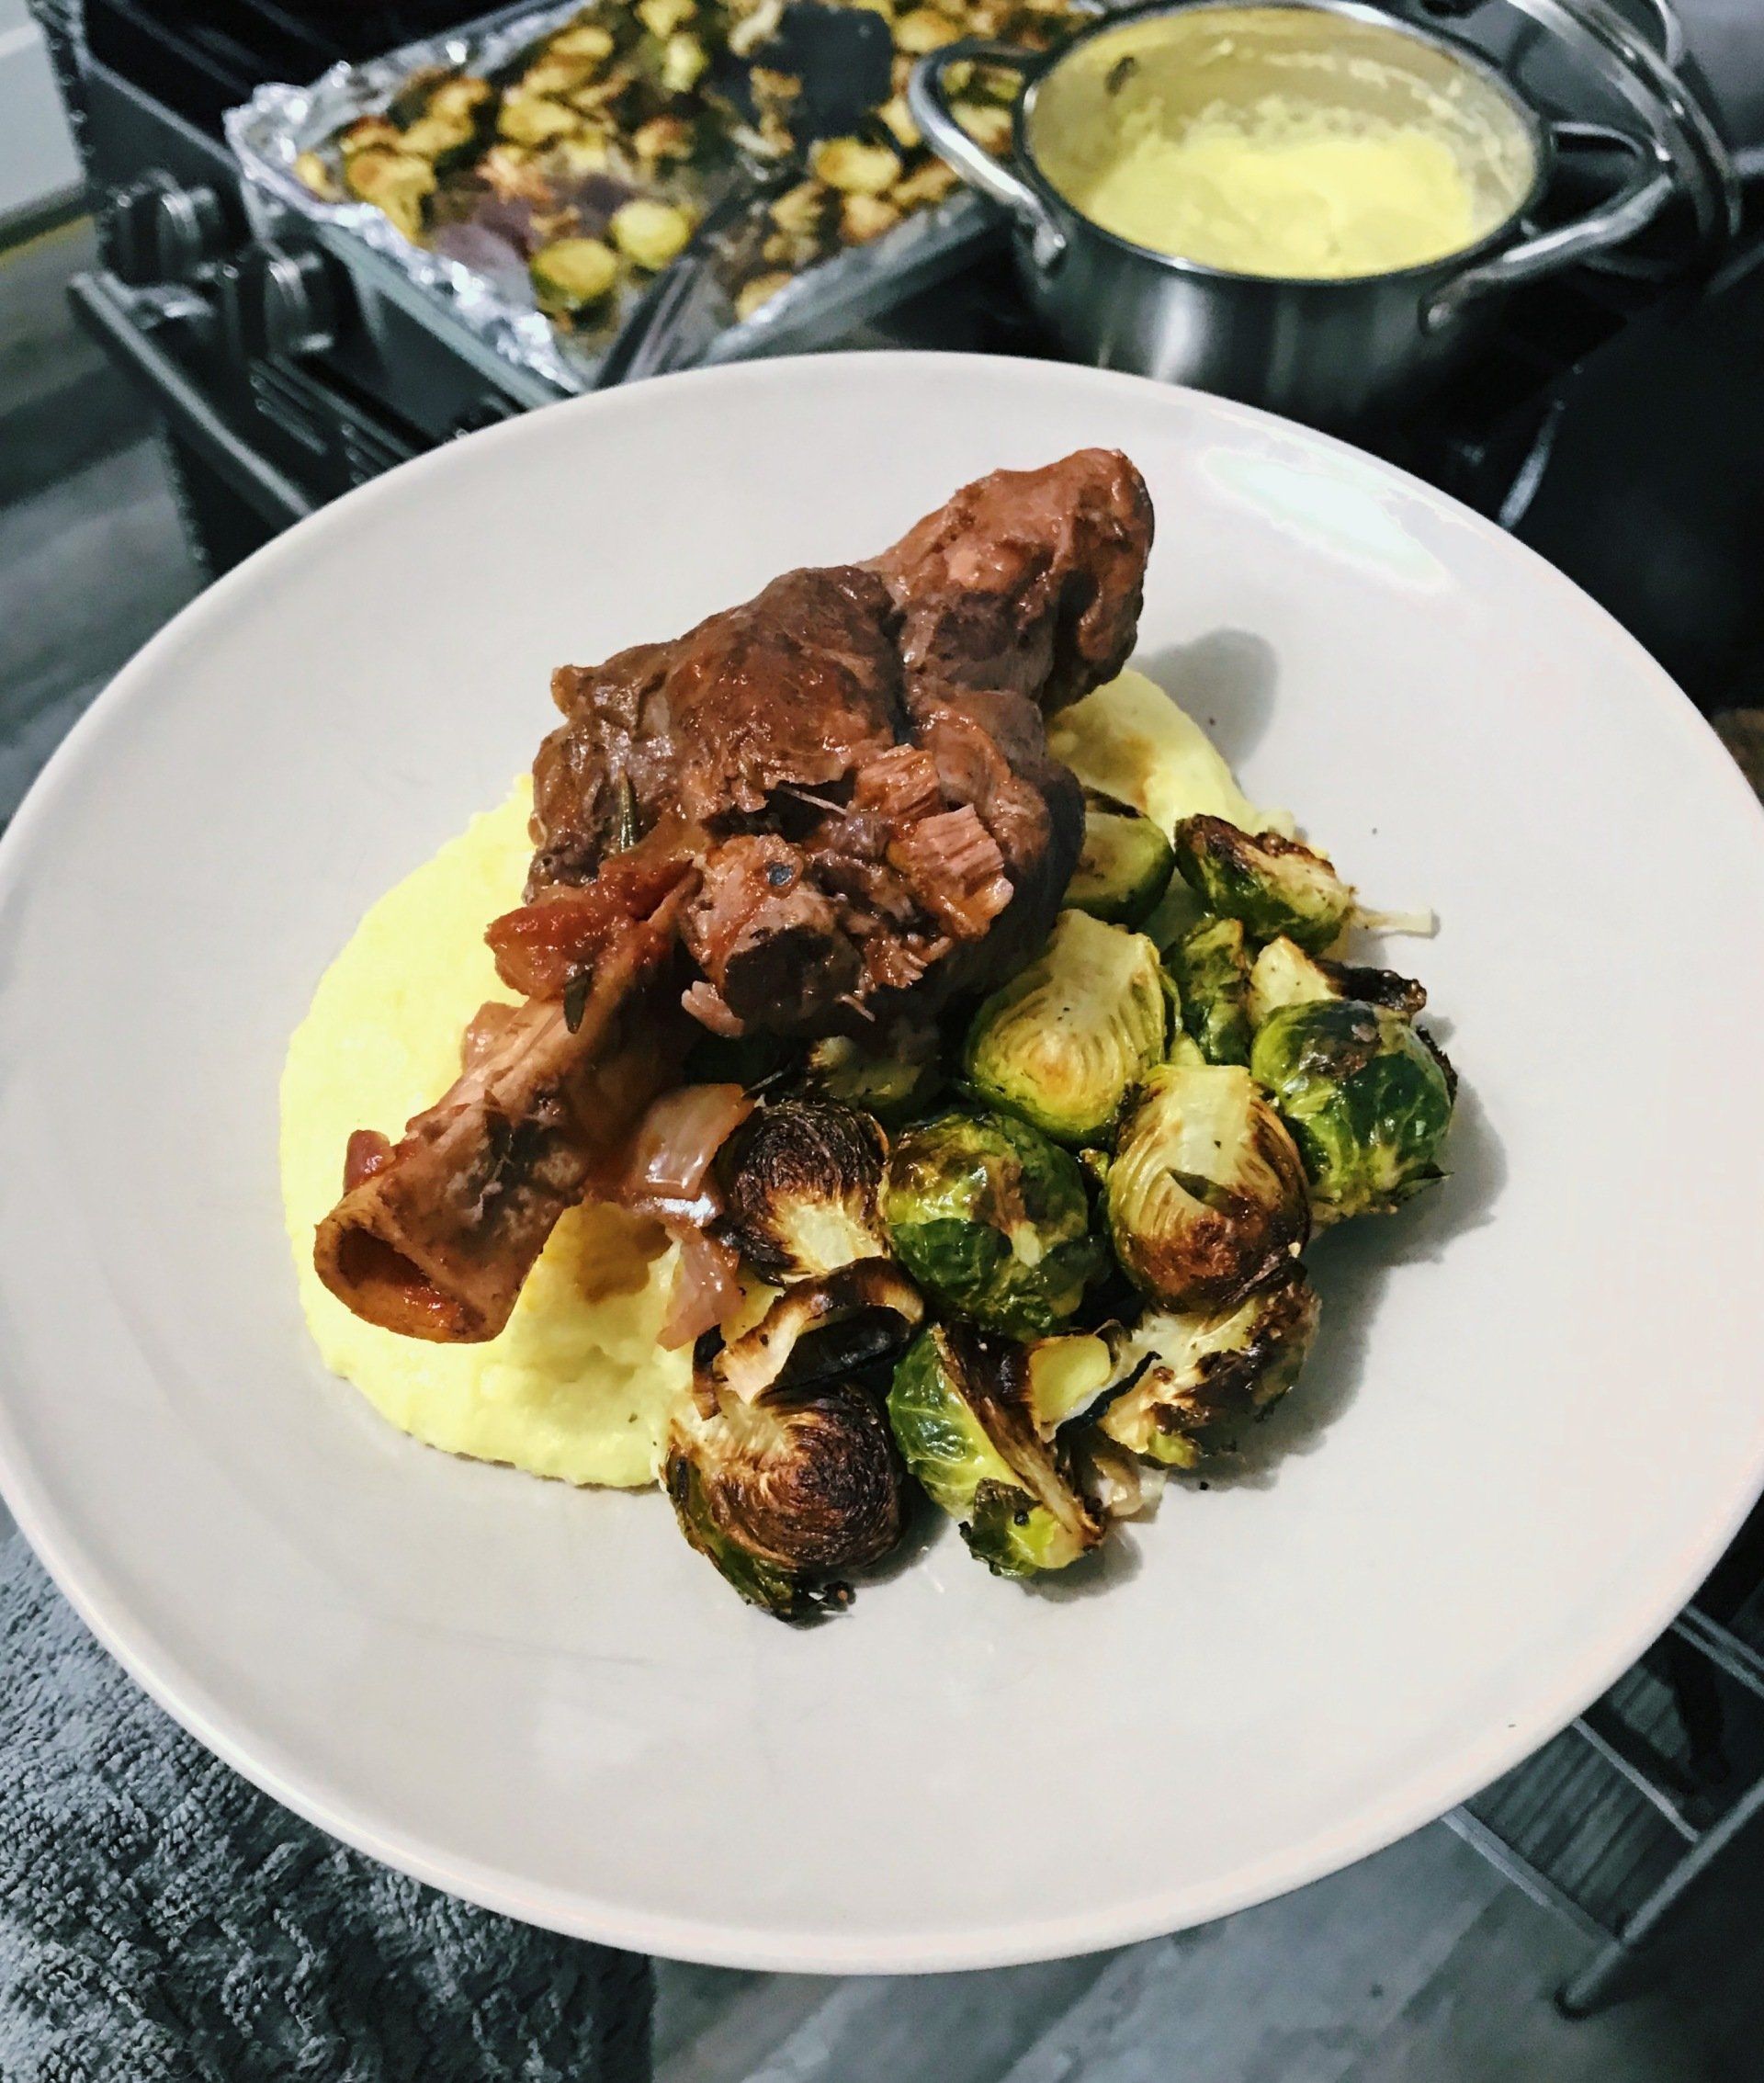
I learned three things while making this dish: trimming lamb shanks is much more labor intensive than I ever thought, raw lamb does NOT smell good, and braised lamb is so delicious. After setting the clocks back an hour, a hearty, comforting dinner is really what I needed to feel better about the whole “dark by 5:00 p.m.” thing. While I was at the grocery store, I saw some lamb shanks at the butcher counter. I had never cooked lamb before, but had eaten it enough to know I like it and was curious to try making it myself. This red wine and rosemary braised lamb shank was so tender it fell right off the bone and was perfectly paired with the creamiest gorgonzola polenta, and crispy roasted Brussels sprouts with leeks. The whole meal warmed my soul and provided solace in these quite literally dark times. If there is a silver lining to be found in cold weather and limited daylight, it’s that it’s the perfect time to enjoy the hearty, rich foods that are a staple of the season. *If you are viewing this on a mobile device, there are three tabs in the menu below- one for each recipe featured in this meal. You have to scroll on the title bar to see the other two.

This recipe was developed out of excitement over two things: my newfound discovery (and love) of persimmons, and the new sauté pan I bought yesterday. To explain the first part of that, I have never had a persimmon before. I didn't know what it would taste like, what texture to expect, or what to do with it. A friend brought one over for Friendsgiving to cut up and put on the charcuterie board, but she only bought it because of it's attractive bright orange color and not because she had eaten one before to certify its deliciousness. So it did not end up getting cut and instead sat on my counter for nearly a week before I decided to make use of modern technology and Google exactly what a persimmon is. I found out that a persimmon is a fruit (duh) that is native to Japan, Korea, and parts of China. They are sweet and mildly flavored, with vanilla undertones and a flesh consistency similar to firm butter. In fact, I am laying in bed cutting slices of and eating one as I type (well, between lines of typing anyway). It happened to be a particularly cold and rainy Sunday, and I was craving a warm, hearty meal that would last me long enough to not have to cook again before leaving to go home for Thanksgiving on Tuesday afternoon. As I thought about warm meals that would pair well with persimmon, my mind jumped to curry. Green curry specifically. The herbal, spicy, and fresh zing of green curry would pair perfectly with the sweet buttery-ness of the fruit, and it would make plenty to last me until I set off for the holiday. I mentioned that the second inspiration from the dinner came from the new sauté pan I bought. Many of the accounts I follow on Instagram are- surprise- food related. As I scrolled through my feed the other day, I saw one of them highlighting the "cold pan" method for making chicken thighs. Seeing how crispy and golden the skin turned out using this trick got me excited to try it myself. I absolutely could have done this in my cast iron skillets, but I had just gotten a new stainless steel pan at Homegoods and was eager to break it in by testing this method for perfect chicken thighs. Crispy Chicken Thighs in Green Curry with Sautéed Persimmons: 1 cup rough chopped cilantro, lightly packed 2 jalapeños 3 cloves of garlic 2 tsp fresh chopped ginger 1 (13.5 oz.) can of whole fat coconut milk 4 bone in, skin on chicken thighs 3 to 4 TBSP extra virgin olive oil Half of a medium yellow onion 2 tsp garam masala 1 tsp cumin 1 tsp salt 1/4 tsp cinnamon 2 persimmons Rice (jasmine or basmati are my preference). Step 1: Preheat the oven to 425° Fahrenheit. Step 2: Trim cilantro leaves from the stems and roughly chop. Cut two jalapeños in half, taking the seeds and ribs out of 1 of them but leaving them both in the other. Though they can be removed from or left in both depending your tolerance and preference for spice. Crush the garlic, Peel and roughly chop the ginger. Add all the fresh ingredients along with 2 TBSP of the coconut milk to a blender and blend until smooth. It is probable that the coconut fat has separated and has formed a solid layer at the top of the can. Just break through this layer with your tablespoon measure to get to the milk. An immersion blender can also be used (most come with a tall plastic measuring cup to blend in). Step 3: Season chicken lightly with fresh cracked salt and black pepper. Place skin side down in a cold pan. Turn on the stove top and heat the skillet over medium. Let the chicken cook for approximately 15 minutes undisturbed. While the chicken cooks, roughly dice half of the yellow onion. The pieces should be no bigger than your pinky nail. After 15 minutes, the chicken should be easy to lift out of the pan with minimal coaxing. Step 4: Remove the chicken from the pan and let it rest on a clean plate. In the same skillet, add 2 TBSP of EVOO and the onion. Sautée until the onion starts to sweat and becomes slightly tender, about 5 minutes. Add your spices and salt, and continue to sautée for another minute or two to release the oils from the spices and develop their flavor. Step 5: When the spices become fragrant, add the curry base of puréed aromatics. Stir to evenly incorporate the onions, then add the rest of the coconut milk, including the separated fat. Add the chicken back to the pan, skin side up. Put the pan on the middle rack in the oven, uncovered, for 12 to 15 minutes. Step 6: Prepare your rice according to directions on the packaging and preference. I personally prefer basmati rice for this recipe, and to make it a little bit stickier. Step 7: While that cooks, cut the two persimmons into wedges. You should get 8 to 10 wedges per fruit, so 16 to 20 total. Heat another skillet over medium heat and add 1 TBSP EVOO to the pan. I used an 8 inch stainless steel omelette pan, but any skillet will work. You will know the oil is hot when it starts to shimmer. This is when you want to add your wedges to the pan. Step 8: Place the persimmon wedges with one side of exposed flesh down in the hot oil. Since the water content is high, it will sizzle quite a bit and will pop. This is normal and nothing to be afraid of. High heat will help to prevent the sugar in the fruit from sticking to the pan. Let these sit to sear for 3 minutes or so before flipping to cook the other side. Depending on how big your pan is, you may have to do cook the wedges in two batches. They will be slightly blistered, golden brown, and caramelized when done. If they do not like this then you can just flip them back over to sear again. While it is best to try and finish the sear the first time around, it is okay to flip them a couple times as necessary. The wedges should be tender but not mushy, and will have a deliciously crisp and caramelized inner edge where it is thinnest. Step 9: Remove the chicken from the oven. It will be done when the internal juices run clear when poked with a sharp knife, and the internal temperature reaches 165° Fahrenheit. Step 10: Spoon rice onto a plate with a lip or into a bowl. Place a piece of chicken on top and spoon over plenty of curry sauce. Top with the seared persimmon wedges and chopped cilantro and jalapeño if desired. Enjoy!

Coworker on Monday morning : "So what did you do this weekend?" Me: "Well I went to a Friendsgiving at a friend's apartment, then popped into another Friendsgiving for a drink at the end of the night, then woke up the next morning and started preparing for my Friendsgiving..." It seems that Thanksgiving is no longer celebrated on just one day at the end of November, but that it has become a whole season itself. And there is no better way to get into the spirit of the season than by celebrating with great food, drink, and good friends who are more like chosen family. A.k.a Friendsgiving.
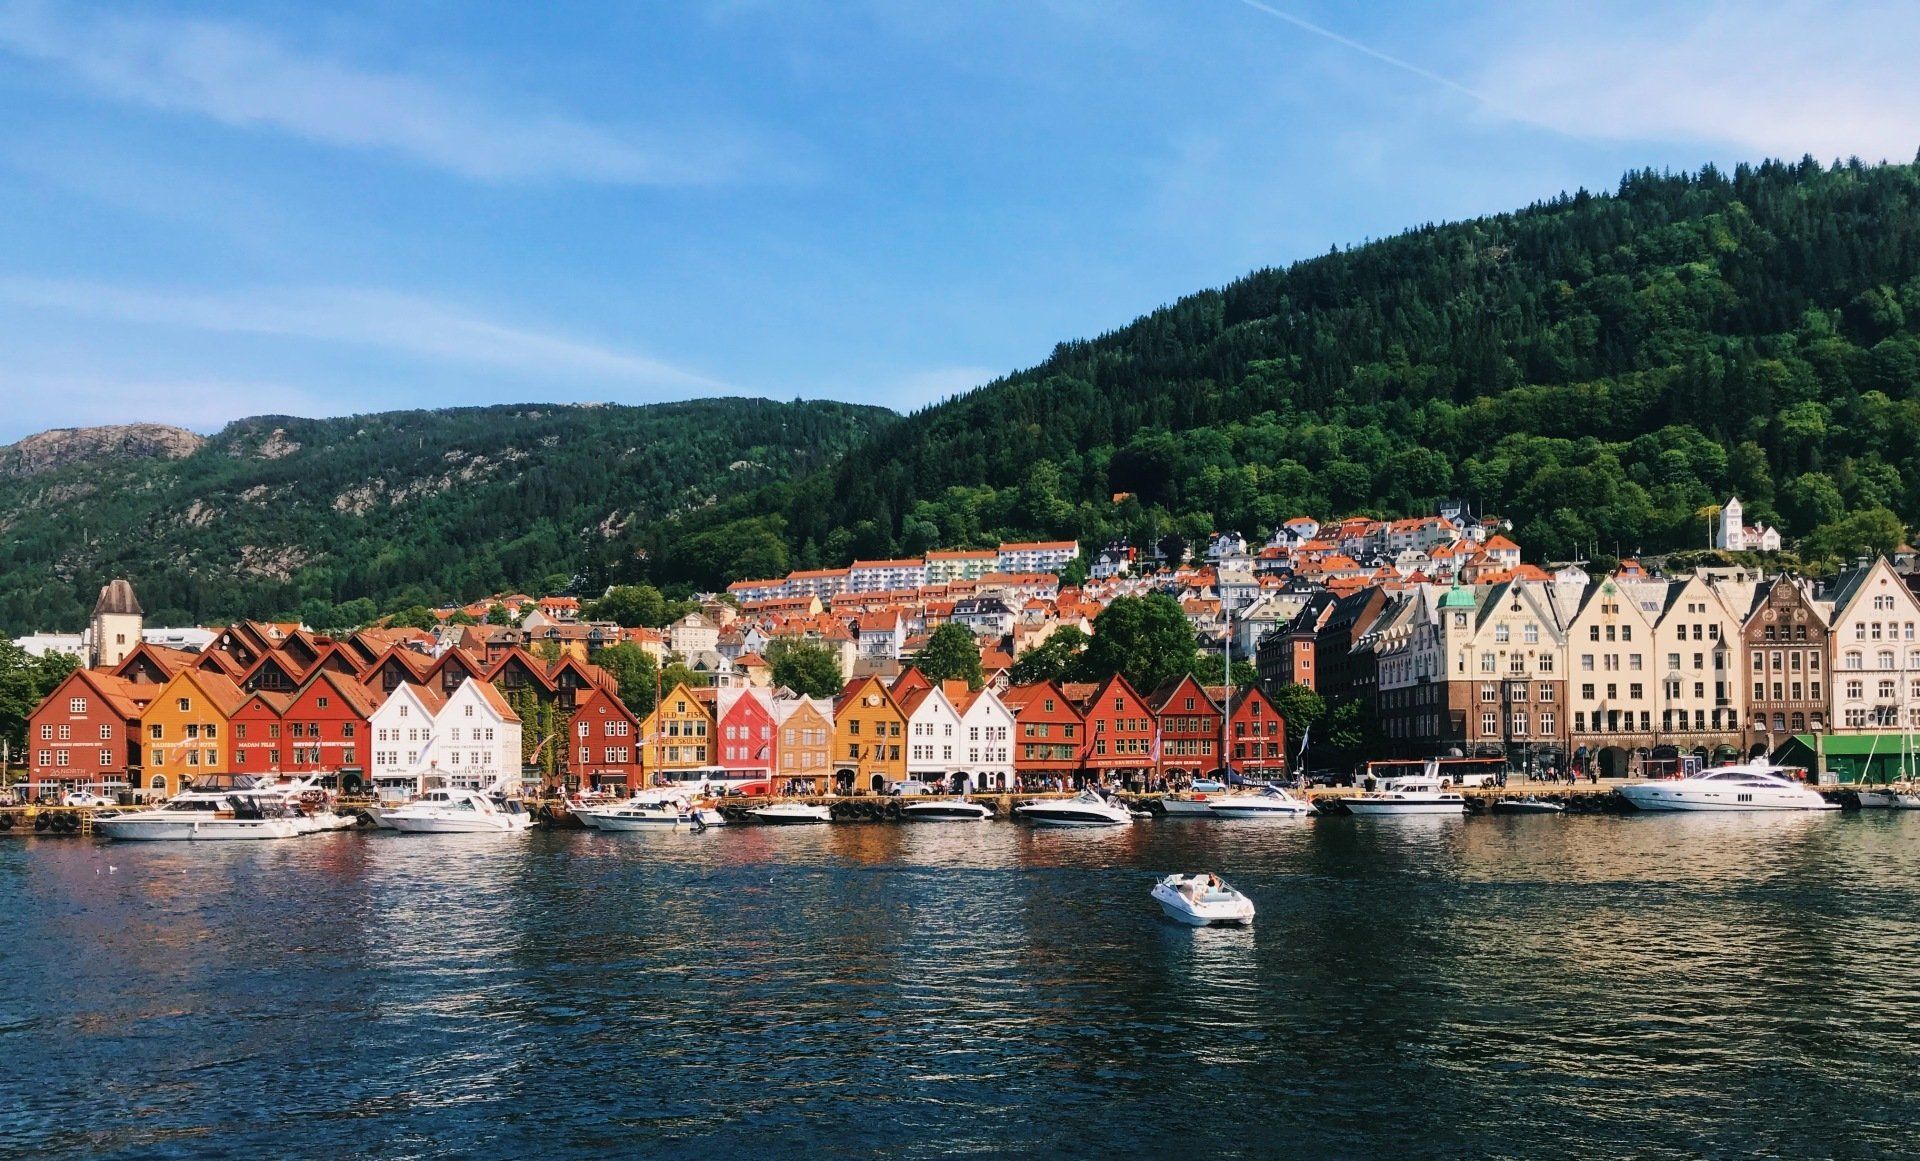
From the start of my semester abroad in Germany I made it a goal of mine to not spend every weekend in a big city, and to get outside more often. Getting lost in the streets of a foreign city is great fun, but sometimes I prefer to trade alleys and avenues for hiking trails. Norway, having some of the most pristine and untouched nature in the world, quickly became a dream a destination of mine and I vowed not to leave Germany without visiting it. Why Norway? : From Oslo up to Lofoten, there is no shortage of beauty here. The fjords cut deep into the country's mainland creating awe inspiring landscapes, and playing home to colorful fishing villages nestled deep within them. Norway can certainly not be considered a budget destination by nature, but you don't have to spend a fortune to enjoy a weekend here. Oslo, the capital, was once an afterthought. It was an airport you might find yourself flying through to catch a connecting flight. But Norway, and Oslo especially, saw an increase in travel in part thanks to Norwegian Airline's low-cost flights from the United States to points of interest across Europe, including several non-stop flights to cities in Norway, and in part to the exciting food, design and art scenes along with incredible outdoor recreational. the country saw a tourism boom. Oslo has become a true destination in itself with a budding food scene, rapidly developing waterfront district, and a great arts scene. The capital is not the only city worth visiting, however, as Bergen lay just on the opposite coast of the country. Easily accessible from Oslo via a short flight or a (long) scenic cross-country train ride, Bergen is full of charm and will be sure to win you over. It is hard to say that there is a bad time to visit Norway. In the winter months it is possible to enjoy cross-country skiing among a myriad of snow sports. And when the sun has set (if it ever rises) there is a strong possibility of seeing the northern lights. The summer months are no less exciting. Opposite the winter, the sun never really goes down in peak summer which means there is plenty of time to enjoy the country's natural splendors. Go hiking or mountain biking and then enjoy your afternoon evening by the pure waters of one of the many lakes or fjords. The people are very friendly, if a little reserved. Public transportation is generally very quiet and people will tend to keep to themselves around strangers unless engaged. It isn't you, just say hi and ask for help if you need it! Where to Stay?: Oslo Youth Hostel Haraldsheim (Oslo): Part of the Hostelling International network, Haraldsheim is a well reputed hostel with clean facilities, free breakfast, and plenty of resources to help travelers figure out their way around Oslo. It only costs about $35 for a bed in a six person dorm room with linens and a towel included. Considering I have paid that much or more in less expensive countries, I was pleased. It is a bit removed from the city center but easy to access on public transportation with numerous trams stopping just a short walk away from the front doors. It is basic but comfortable ,and an overall good value for the money. Haraldsheim is a worthwhile place to stay when visiting Oslo. Montana Hostel (Bergen) : Like Haraldsheim, the Montana Hostel is also located a bit out of the city center. It is accessible by a public bus that stops just across the street. There are great views over the city and fjords from the property which makes the slightly more distant location worth the effort to get there (though it really is not much effort). Montana offers a free breakfast and the staff organize activities in and around the city for guests to participate in each day. A bed in a four person dorm goes for about $30. If you're lucky like I was, no one else will be staying in any of the other three beds. What to Do (Oslo): Sunbath at Sørenga : Sørenga is a neighborhood on the waterfront in Oslo. There is a small beach and a greater system of docks installed over the water to allow for locals and visitors alike to catch some sun and enjoy a swim in the Oslofjord during the warm summer months. Spend the morning here before it gets too crowded or come back in the evening after the masses have left to enjoy a view of, and maybe a swim in, the cool fjord waters. In contrast, look back into the city to get great views of the modern Opera House and Barcode Project which was completed in 2016. Holmenkollen: This neighborhood of Oslo is where the former Olympic park can be found, including the impressive and iconic ski jump. It is not far out of the city and can be reached by taking the 1 train in the direction of Frognesteren easily. The panoramic views from the top of the jump are debatably the best in the city, and the ski museum underneath the jump showcases more than 4,000 years of skiing history. Skiing is no joke in Norway. No snow is no excuse not to get out and practice. Take a walk around the park and you will find a paved cross-country skiing training track with people racing around it on what look like very long roller blades, and a bit further down the hill is the practice ski-jump where you may be lucky to catch a practice. The skiers race down the hill on wetted turf before making their jumps hurtling through the air. It is an exceptionally exciting sight to see. There are a series of hiking, biking, and walking trails to enjoy in this area, too. Ekeberg Sculpture Park : Ekeberg Park is sure to impress anytime of the day, though I recommend coming here at sunset. Wander the grounds here and get lost in a world of imagination. You never know what you will find behind the bushes and in the trees here. The cover photo for this website was taken there. You will find excellent panoramas of the city skyline and views into the fjord. There is a restaurant here if you like your food with a view. Munch Museum: Spend a few hours browsing the works of the famous Norwegian painter, Edvard Munch. (which you could spend a good few hours in alone). To some contest, the museum is slated to move to the waterfront with the Opera House and Barcode. No matter where it is located, it is worth the time to stop in followed or preceded by a stroll through the botanical gardens, conveniently located right next to the Other Points of Interest: Karl Johans Gate is the main shopping and pedestrian street in the city and offers excellent people watching. It leads up to the royal palace. Stop into the Old Town to see some traditional Oslo architecture, and browse the arts and vintage markets in Grünerløkka. Catch a show at the iceberg inspired Opera House or pack a picnic and enjoy it on the roof all the same. What to Do (Bergen): Hike Mount Ulriken: Mount Ulriken is the highest peak of the seven mountains that surround Bergen. This is a popular hike so I recommend taking advantage of the extended day light period and getting out early. I started my hike at 6:30 in the morning and met very few other people on the trail. The sun was shining and the sky was bright blue at this time. Take in the views of the surrounding mountains, city, and fjord from the peak before starting your descent. I reached the bottom again around 8:30 (I hiked quickly and spent little time at the top) where I walked against large crowds of people starting on their hike to the top. There is a cafe at the top, and a cable car Ulriken643, too. Take a Fjord Tour: Bergen is considered the gateway to the fjords which means you have to go for cruise in one. Go with Rødne Cruises for a three hour trip in and out of the Osterfjord. On a longer trip, I may have sprung for a longer ride into the Sognefjord, the deepest fjord in Norway, but I had limited time to spend so three hours proved to be perfect. Deep in the fjord, you will small villages where colorful cabins dot the shore, and dramatic mountains rise behind them. The boat taxied up to a waterfall where a crew member filled up a bucket of fresh mountain water. A tasting is offered of course. It was exceptionally crisp, cool, and refreshing, and exceptionally clean. Fish Market: Bergen's fish market might be one of its most well known sites. The outdoor market has been a staple of the city since as far back as 13th century. Today, vendors sell fish, fruit, flowers, and other locally produced goods. While you're here, take a walk around the harbor and admire the charm of the Bryggen neighborhood where the colorful wooden shops are nestled together in a tight row. The Leprosy Museum at St. Jørgen's Hospital: Between 1850 and 1900 Bergen had the largest concentration of leprosy patients in Europe, treated in three different hospitals. St. Jørgen's was the most active, treating patients from the 15th century to the middle of the 20th century. The present day building in which the museum is housed dates back to the 18th century. The hospital was raised on the site of the Nonnester convent in the 1400's. It is likely the food and herbs used to feed and treat the patients were supplied by the convent. Today, St. Jørgen's does not stand in memory solely as a monument to the individual battles lost to Leprosy, but as a testament to the extensive and ground breaking research performed here. Where to Eat (Oslo): Illegal Burger: Burgers are having a real moment in Norway right now. It seems every other restaurant is serving up the beef patties but few do it much better than Illegal Burger. If you are on a budget then this is also a good option as it is one of the cheaper eateries in the city. They have an excellent selection of burgers from traditional to creative and good selection of beer, too (including an IPA brewed specifically for the restaurant). A lunch here wont cost you much more than $15- yes, that is considered a cheap meal by Norway's standards. Villa Paradisio: You can't go anywhere in Europe without finding Italian food and I'm not complaining about it. Villa Paradisio is serving up great pizzas and other Italian fare at fair prices right in the center of Grünerløkka. There will likely be a wait- which I always take to mean a restaurant is good- so plan accordingly. A margherita pizza goes for about $12. Lorry Restaurant: I will never leave a place without eating having traditional meal first. For this I went to Lorry Restaurant which serves up in Norwegian classics in an eclectic pub-like setting. I order the blue mussels fresh from the North Sea. The restaurant also has hundreds of beers available so it is impossible not to find something to pair perfectly with your meal. You will certainly pay a little more here but it is worth it. Go early for a seat on the patio. If you can't get one there the inside is just as nice. Where to Eat (Bergen): Trekroneren: I was only in Bergen for about 18 hours so I did not eat much. I had my free breakfast at the hostel but was hungry again after I got off boat at the end of the fjord tour. I did not have much time to eat before having to go to the airport so I stopped at the Trekroneren for a sausage. The little shack is located just off the harbor and serves up a variety of sausages through a little window. I tried the reindeer sausage with lingonberry sauce, mustard, and fried onions. It was the perfect send off before heading to the airport. The best part is that it only cost $8. How to Get Around: Train: Take the train from Oslo to Bergen. The journey takes about seven hours but you will be captivated by the beautiful vistas the entire time. Watch through huge windows as farms, glaciers, mountains, and the rest of the pristine Norwegian countryside roll by on the horizon. I flew back to Oslo from Bergen the next day (the flight is less than an hour long) but the train journey is one everyone visiting Norway should make. Public Transportation: You will definitely want to make use of the public transportation in Oslo. the downtown and city center is easy enough to walk around but there are plenty of destinations just outside the city that are much more easily reached by metro, bus, or tram. Similarly in Bergen, you can walk everywhere in the downtown but you'll want a bus pass to get around to the surrounding areas (hostel included). Walk: As I said previously, walking is a viable option in the city centers and around individual neighborhoods (but not necessarily between them). Restaurants, bars, and other points of interest are close enough to each other, plus you'll see more of the city this way. Just be sure to wear a comfortable pair of shoes! Rent a Bike: I did not do this myself but I saw plenty of people on bikes around the city and many bike rental outposts. Both cities are bike friendly and this is certainly an efficient way to get around. Despite only spending three days in Norway, I did as much as I could and got to see a great deal of the country. I know there is more there that I want to see but and more than I will probably be ever to see. The untouched nature and pure beauty of Norway should land it a spot on any traveler's bucket list. This will likely be a country you'll want to return to time and time again.

I am not a great fan of the winter or cold weather. But if there is any silver lining in the temperatures dropping, it's that it makes for the perfect time to enjoy hearty and warming meals. One of my favorite cold weather foods is chili because it is hot in both temperature and flavor (degree of spice may very) which provides for a wholly comforting dining experience. I don't usually follow a recipe in the kitchen. I scrap together knowledge of flavors, techniques, and lessons learned from plenty of past experiments to make what I do. One day a couple weeks ago I got a text from a friend who was asking if I had a chili recipe to share. Did I have a chili recipe? Yes. Did I have it readily available to share? No. It's not that it is a secret recipe by any means. In fact, I wanted to share it! I am sharing it! It was just stuck in my mind. It wasn't so much a recipe as it was a reflex to make it. So I told my fiend "I'll make a pot this weekend, write down the recipe and process, and share what I get." This is a (slight) adaptation of my dad's chili, which I will say is one of the best things he makes (and he makes many excellent things). I set out into the kitchen with all of my regular utensils, spices, and ingredients, plus a pen and note pad to record the process. This is the first recipe I have properly written so I hope I have done in writing the justice enough for this chili to be recreated the way I have always enjoyed it. The Best Beef and Bean Chili • 1 Medium yellow onion • 2 large cloves garlic or 3-4 small medium cloves • 1.75-2 lbs ground beef • 3 TBSP tomato paste • 1 TBSP cumin • 3 tsp salt • 3 tsp chili powder (4 if using only 1 tsp cayenne) • 2 tsp cayenne (1 if averse to spice) • 2 tsp cocoa powder * • 2 tsp paprika (can use smoked, sweet, or hot. I prefer smoked) • 1 tsp ground black pepper • ½ tsp cinnamon • ½ tsp allspice • 1 28 oz can crushed or whole peeled tomatoes • 3 cups of beef broth • 2 oz. fresh brewed coffee (the darker and bolder, the better) * • 1 can of kidney beans, drained and rinsed • 1 can of black beans, drained and rinsed • 1 dried Ancho chile or chipotle (smokier, spicier than Ancho) * 1. Heat a large pot, preferably a Dutch oven, over medium-high heat. While the pot heats, roughly dice your onion. Pieces should be about .5 cm x .5 cm, or about the size of your pinky nail. Mince garlic (I advise against using a garlic press here since it will make it too fine).
2. Add 2 TBSP olive oil to the heated pot and add onions. Stir them every so often to avoid too much browning, burning or even cooking. Cook until they start sweat and become lightly translucent, about 5 minutes. Ad garlic and cook another minute.
3. Add the beef to the mixture, making sure to break it up to avoid unevenly large chunks forming, and to mix in the onion and garlic.
4. Once the beef has cooked until there is no visible pink, add the salt, all of the spices, and cocoa powder. Cook for 2-3 minutes to release the oils and develop the flavors. When the mixture becomes fragrant, add the tomato paste. Tomato paste is thick and will not very quickly mix in with the beef. It may take a minute or 2 to evenly combine it all. Stir it around every minute for 5-7 minutes. It will start to brown on the bottom of the pan. This is called fond and is going to help build great, deep flavor. It is not burning, it is caramelizing.
5. Add 1 cup of beef broth to the pot to deglaze the pan. Deglazing is the process of lifting the fond from the bottom of the pot by adding a liquid to the hot pan or pot. Add the can of tomatoes. If using whole tomatoes, you can either open the can in advance and roughly dice the tomatoes before adding them to the pot (reserving the liquid they were packed in for the chili), or crush them in the pot with your wooden spoon/utensil of choice.
6. Add the rest of the beef broth, kidney beans and black beans, coffee and chile if using.
7. At this point the chili will be more like a soup. It’s fine to eat as is, but will taste infinitely better after letting it simmer on the stove top to fully develop the flavors. Reduce the heat to low/medium-low and simmer. 2 hours is fair time to let the ingredients marry, though the longer it goes, the more flavorful it will be. If you notice too much liquid starts to evaporate, add ¼ cup of water at a time to keep hydrated (though this should not be necessary). If you have to add more ½ cup or more, turn the heat down as it is probably boiling, not simmering, and losing too much liquid too quickly. Leaving the lid on while simmering will reduce liquid volume loss to evaporation. 8. Every half-hour to hour, skim the surface of the chili for excess fat and oil. You do not want to remove all of it, but you will see some pools start to form as a result of separation. Skim as much as you can off the surface.
9. Serve with cornbread, sour cream, cheese, tortillas, tortilla chips, avocado slices, queso fresco or cotija, or whatever else you enjoy chili with.
